A Step-By-Step Guide To Descaling Your Tankless Water Heater With Vinegar
We may receive a commission on purchases made from links.
Imagine waking up to a chilly morning anticipating a warm, comforting shower only to find that your tankless water heater has decided to perform an unsolicited rendition of "Cold Water" by Major Lazer. The villain behind this chilly surprise could be none other than a buildup of minerals, scale, and sediment in your water heater. Descaling comes in handy here. However, flushing your tankless water heater isn't secret knowledge reserved for pricey plumbing professionals. Armed with a couple of gallons of household vinegar, a few other supplies, and a can-do attitude, you're all set to ace this task.
Descaling your tankless water heater with vinegar yourself is fantastic news for your wallet, given that a professional will charge you anywhere between $150 and $450 for the same feat. And it's much less about flaunting your DIY skills and more about ensuring the longevity and efficiency of your unit.
Apart from white distilled vinegar (a household staple), the few other supplies for this tankless water heater maintenance task won't send you on a wild goose chase. Most are basic, and if the pricey ones (think submersible pump) aren't already in your possession, they're available for rent at the local hardware or home improvement store.
But then, how often should you descale your tankless water heater? While the universal answer leans toward annually, heavily used systems in hard water zones might need attention every six months.
Gather the required supplies

Descaling a tankless water heater with vinegar requires not just DIY spirit but also preparation. As for the supplies, you need a sturdy vessel: a 5-gallon bucket, to be exact. Next, procure a submersible pump — the Superior Pump 91025 ⅕ HP Thermoplastic Submersible Utility Pump, available for $90.37 on Amazon, is a worthy contender. However, if such a price tugs at your purse strings, Home Depot rents a similar pump for around $16 for four hours (the exact price is determined at your store) — an excellent option if you wish to allocate your gold elsewhere. Whichever your path, double-check that the equipment doesn't demand a specialized descalant.
The magic potion for this tankless water heater maintenance task comes in the form of three to four gallons of vinegar. But what vinegar do you use to flush a tankless water heater? Well, white distilled vinegar's acetic acid content is enough to dissolve mineral deposits without harming your unit. The product isn't costly, either. For example, a gallon of White House White Distilled Vinegar goes for $3.32 at Walmart. So, expect to spend around $9 and $13 on vinegar.
Two hoses will serve as the vinegar conduits. They'll carry the vinegar into the water heater and back into the bucket, completing the descaling cycle. For roughly $13.99, you can acquire a pair of K&J Premium 6ft Rubber Washing Machine Hoses on Amazon. Lastly, rags or towels will be your shield against the inevitable spills and drips.
Shut off the power and gas

The first and perhaps the most crucial step in any DIY endeavor is safeguarding your domain against possible accidents or unwelcome surprises. The concern associated with descaling a tankless water heater with vinegar revolves around electrical shocks or potential gas leaks.
You'll find the gas valve near your tankless water heater. If parallel to the gas line, the valve suggests activity; when perpendicular, it indicates safety. Use the energy derived from your determination to gently set this valve into a perpendicular position.
Similarly, turning off the power source supplying electricity to the water heater draws the curtain on any electrical threats. A simple push of a button on the water heater panel, unplugging the power cord, or flipping off a switch in the breaker panel will suffice here.
Shut off the water valves

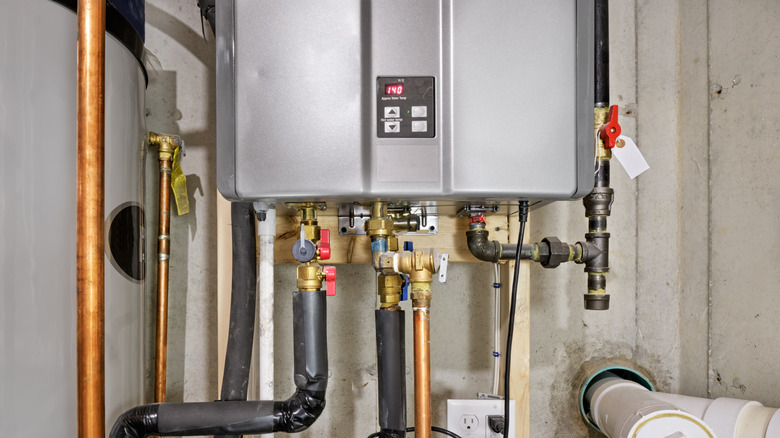
Next on descaling a tankless water heater with vinegar, picture yourself as a skilled technician locating the hidden gateway to initiate this mission. Right beneath the heater, two guardians await — the service valves. These aren't just any valves; they're the gatekeepers of your descaling journey, one cloaked with a blue handle, representing the inlet, or cold water path, and the other in red, marking the outlet for hot water.
Closing the inlet valve ensures no more water enters the battlefield. Next, face the outlet valve, the second guardian. As it ceases its duties, the hot water path is sealed off, creating a contained arena where the descaling will happen, free from external interference.
And should your valves not wear the typical colors of blue and red, or if you find yourself puzzled by their appearance? Your tankless water heater manual swoops in here to help you accurately identify and command the components, regardless of their disguise.
Remove the service caps on the flushing valves

Now that the power and water supply are turned off, it's time to release the water stored within the water heater — a task assigned to the flushing valves, often referred to as "isolation valves." The blue one is connected to the pipe that supplies the fresh water, while the red is all about the hot stuff, linked to the pipe that sends heated water into your home.
Before you begin, set up your stage: Picture your five-gallon bucket as a waiting chalice under the heater, anticipating the cascade of water soon to descend on it. Next up, pop those protective caps on the service ports off; it's as simple as unscrewing a lid off a jar.
Now, you can open up the flushing valves. The blue one is likely to be a bit shy, releasing a gentle flow. But watch out for the red valve! It's expected to come out with a bit more gusto, thanks to the water that's been lingering in your heating unit.
Clean the pre-filter

Even in a well-fortified castle, there are usually unsung heroes who form the first line of defense. In a tankless water heater, this honor belongs to the pre-filter. Nestled outside at the bottom of your unit or along the water supply line, it captures dirt and debris before it can reach the inner sanctum of the water heater.
Your task here is to remove the pre-filter delicately and clean off any buildup. A toothbrush makes for an excellent ally in this task. Alternatively, bestow upon the filter a vigorous shake in water. Once the pre-filter is clean, return it to its position of honor. A wrench or pair of pliers (think Channellock Tongue and Groove Plier on Walmart) should impart the necessary nudge to keep the component snug or even assist in unscrewing it when needed.
Connect your hoses to the service ports

Connecting the hoses represents the beginning of an elaborate waltz that will weave the story of purification. Each hose plays a designated role. The "hot" hose channels the mineral-deposit-infused water back to the bucket; the "cold" hose transports the vinegar deep into the belly of the tankless water heater.
Ensure you handle each hose with care as you connect them to the water heater's service ports, bearing in mind a misstep here can mean potential vinegar spills. Secure each attachment, ensuring the hoses are snug and ready to perform. You can even wrap Teflon tape around each connection point.
Set up the pump and bucket

Take note of that hose linked to the "cold" service port on your tankless water heater — unite it with the output of your submersible pump. The pump will drive the vinegar into the water heater through this pipe. Following this, position the submersible pump inside the 5-gallon bucket.
Think of the bucket as the staging ground for the descaling operation. Into this vessel, you'll also place the "out" line, its end secured to the bucket's bottom to prevent rogue splashes of vinegar. This setup is somewhat akin to a scaled-down version of a water circuit.
Add and circulate the vinegar

Next, ease into the act of pouring three to four gallons of vinegar into your bucket. This quantity is enough to envelope the pump's bottom by several inches. Note that letting the vinegar level drop beneath the pump's base is courting calamity for the equipment. With the precaution observed, trigger the pump into action. Suddenly, a scene unfolds: The vinegar races through the water heater, devouring mineral and limescale buildup on its way.
Witness as vinegar exits back via the pipe connected to the red service port — a distinct swirling motion in your bucket will be your cue. Let this stirring scene persist for about 45 to 60 minutes, enough time for the vinegar to win its battle against inside the heater. If your unit has severely suffered under the scale buildup, you might have to extend this performance. Over time, the initially clear vinegar transforms into a murky solution.
Flush the system

Once the ritual of circulating vinegar concludes, an immediate task arises — ridding the water heater system of residual vinegar. This begins with closing the flushing valves first. Now, disconnect the washing machine hoses from the water heater's service ports and thread the protective caps back. A wrench will suffice for tightening these caps.
Meanwhile, get the blue (cold) and red (hot) water valves back into action, and open a faucet in your house. Let clean, fresh water traverse through the water heater and out of the faucet for about one minute. The initial water flow might carry the strong aroma of vinegar, but it will fade eventually, proving that the system is indeed clean.
Discard the dirty vinegar

With the submersible pump extracted from the bucket, It's now time to carefully discard the vinegar, but not without acknowledging its critical role in maintaining your tankless water heater's health. The vinegar potion, filled with remnants of the vanquished mineral deposits, is environmentally friendly and can be disposed of safely.
However, tread with caution here. The versatile cleaning warrior that is vinegar can be quite ruthless due to its acetic acidic content and might harm vegetation and some surfaces. It's best poured down a sink with running water or discarded onto bare gravel, far from your neatly manicured lawn or freshly painted walls.
Restart the water heater

Switching on a freshly flushed tankless water heater bears a promise of warmth and efficiency. But first, take a moment to ensure the pre-filter is clean. You can now restore power (plugging the power cord, restarting the circuit breaker, and pressing the power button) and gas (the handle should be parallel to the gas line) to your water heater.
As you ready yourself to step back into normalcy, scrutinize the water valves for potential leaks and tighten any loose connections if necessary. And just like a castle has its unique charm, your water heater might require a specific starting protocol, which could culminate in referring back to the manufacturer's guidelines.
When to consult a professional when descaling a tankless water heater

There comes a time when the noble quest of flushing a tankless water heater transcends the boundaries of a mere mortal's capabilities. For example, imagine discovering that your system lacks the flushing valves — the very gates to ensure a safe and thorough cleansing. It's akin to navigating a treacherous mountain without a rope. In this case, hiring a professional plumber is not just advisable but essential for installing the missing components, setting the stage for a successful descaling.
But the path sometimes reveals signs more subtle, whether mysterious inconsistency in the water temperature or hesitancy in water's once eager flow, indicating a disturbance within. But it might be the eerie groan and clanks stemming from water hammering — a fluid pressure phenomenon born from the abrupt shift in water direction. All these are a call for eyes trained to see and ears tuned to hear the distress of your unit.
Now, of warranty and DIY water heater fixes. To venture beyond guidelines provided by your water heater's manufacturer is to tread a path fraught with voided promises and lost protections. So, if there's any doubt regarding your innate plumbing skills or a looming concern that your attempts at system flushing could inadvertently lead to damage significant enough to nullify your water heater's warranty, it's wise to enlist professional assistance.