How To Cut Baseboard Corners Like A Pro (& The Biggest Mistakes To Avoid)
Installing new baseboards seems like a rudimentary DIY task — until you're forced to cut and fit the corners. If you've ever nailed baseboards in your home, you'll know how much of a nightmare it is to get the two pieces to fit neatly, without gaps. Sure, intersecting home walls are seldom framed to exactly 90 degrees, but even accounting for the divergence in your angle cuts doesn't always guarantee precise alignment of the two baseboard sections.
Now, if you're using paint-grade trim, you're probably thinking — who cares? That's what caulking is for. Caulked baseboard corners should look just fine, especially once you paint them. But trust us, even with your best efforts to conceal imperfections, corners that lack a seamless joint will stand out. And if you're using a beautiful, stain-grade oak baseboard, you can forget about the caulking. Your cuts will just have to be good enough, since you can't cheat by filling in the joints. The good news is that with a few simple tricks, you can cut perfectly snug baseboard corners without issue. For inside corners, this will mean coping, which is not really as tedious or overwhelming as you may think. Meanwhile, a simple formula will prevent you from making a mistake DIYers often make when calculating angle cuts.
Coping helps inside baseboard corners fit

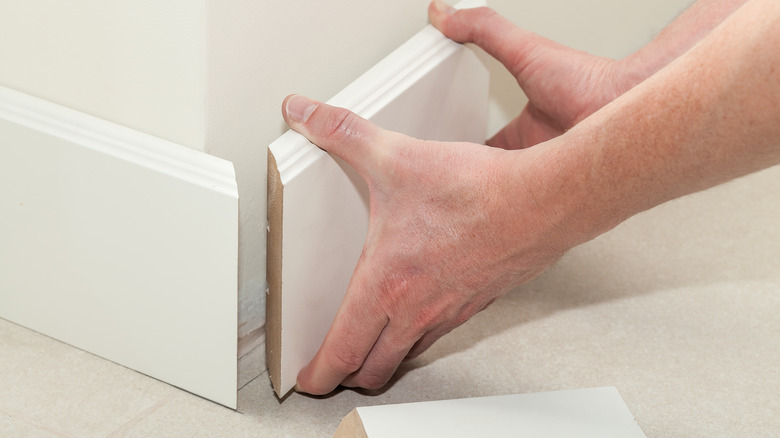
Coping is a cutting technique that involves sculpting the edge of a baseboard to fit the silhouette of the intersecting board at an inside corner. With coping, you don't need to make angled cuts in both edges, which doesn't always work for inside baseboard corners. While 45-degree cuts should line up two pieces of trim on perpendicular planes, the walls of a home almost never intersect at a right angle. Even a few degrees' difference prevents the two sections from fitting tightly together. Coping resolves this misalignment — the razor-sharp, coped edge will come up seamlessly against the intersecting baseboard even if the corner is not exactly perpendicular.
For best results when coping a baseboard corner, use a miter saw to make the initial, 45-degree cut across the edge. However, you can still sculpt the edge well with a simple coping saw like this one from Lowe's. To begin, place the board you want to cut face up on a flat surface. Next, place the other board on top of the first one edge-down, perpendicularly. Now, use a sharp pencil to trace the outline of the silhouette onto the board that you'll be cutting. Then, make a 45-degree cut from the outline to the opposite edge of the board. Finally, use the coping saw to gently cut along the outline, making relief cuts in the edge as needed. The piece should fit tightly against the perpendicular baseboard.
Don't just split the angle in two when calculating cut angles

There are times when coping is not an option for you. For example, since coping only works for inside corners, you'll need to make accurate angled cuts to fit two baseboard sections on an outside corner. Likewise, you may just not feel comfortable tracing and cutting along the silhouette outline to produce a precise cut. In these cases, you'll have to measure the corner at the two intersecting walls and calculate the angled cuts from there.
This is where many DIYers make a seemingly insignificant error — they divide the angle measurement by two. But doing so leaves a gap in the miter you're creating. Why? Because the baseboard edge you're cutting does have a perfect, 90-degree angle. To correct this error, take into account the fact that you're making a cut on a right-angled board. Here's an easy way to calculate the correct cut angle. Start by subtracting the corner angle from 180. Then, split the difference in half and set your miter saw to the resulting measurement. For example, if the angle measures 89 degrees, subtracting it from 180 leaves you with 91. Divide 91 by two, and you get 45.5 — that's the angle to which you should set the saw to produce the perfect miter cut.